Importance of having good software procedures for repairing a computer running Windows
Computers have become quite important in our daily lives, and it’s desirable to ensure they’re running optimally. Repairing a computer can be an overwhelming task, but with the right software procedures in place, you can simplify the process and keep your Windows-based computer in top shape.
Having good software procedures for repairing a computer running Windows is essential for various reasons. It helps prevent data loss, optimises system performance, and extends the lifespan of your device. Moreover, it enables you to diagnose and fix issues more effectively, saving you time and resources.
In my own experience, I recall a time when one of our lab computers started acting up out of the blue. It was slow, unresponsive, and would crash repeatedly. As a senior technician, I rely heavily on our computers to work all the time, and this sudden breakdown was pretty frustrating, to say the least! Fortunately, I was familiar with effective software procedures for repairing a computer, which helped me resolve the issue quickly and get back to work.
Here’s how it can help you do some basic software troubleshooting and repairing a computer!
5 free tools we will cover in repairing a computer
In this article, we’ll explore the 5 best software procedures for repairing a computer running Windows. These procedures will help you diagnose and resolve common Windows issues, ensuring the optimal functioning of your device. We will cover the following:
- Running Adwcleaner
- Running SFC and DISM
- Disk Cleanup
- Running Autoruns
- Using Event Viewer
By following these procedures, you’ll be better equipped to tackle various computer problems and maintain the health of your Windows-based computer. So, let’s dive in and learn more about these essential software procedures!
Go to Gooroo Computer Repairs for professional computer repair services
Running Adwcleaner
Explanation of what Adwcleaner is and why it’s important for computer repair
Adwcleaner is a powerful software tool designed to remove adware, unwanted toolbars, browser hijackers, and other potentially unwanted programs (PUPs) from your computer.
These intruders can negatively impact your computer’s performance and even compromise your privacy. Using Adwcleaner from Malwarebytes is an essential step in repairing a computer, as it helps clean up your system and ensures a smoother user experience.
I remember a friend of mine who constantly complained about annoying pop-up ads and slow browsing speeds. After I suggested they run Adwcleaner, they were amazed at how much their computer’s performance improved. This goes to show the significance of this tool in the computer repair process.
Let’s get yours sorted!
Steps to follow when using Adwcleaner for computer repair
Here are the steps to follow when using Adwcleaner from Malwarebytes to repair your computer:
- Download Adwcleaner: Download the latest version of Adwcleaner from the official website. Make sure you download it from a trusted source to avoid installing malicious software.
- Close all running programs: Before running Adwcleaner, close all open applications and save your work, as the tool may require a system restart to complete the cleaning process.
- Run Adwcleaner: Locate the downloaded Adwcleaner executable file and double-click it to run the program. You may need to grant administrator privileges for the software to function correctly.
- Scan your computer: Click the “Scan Now” button in the Adwcleaner interface. The tool will then scan your computer for adware, PUPs, and other unwanted software. This process may take a few minutes, depending on your computer’s specifications and the number of files being scanned.
- Review and clean: Once the scan is complete, Adwcleaner will display a list of detected items. Carefully review the list and uncheck any items you don’t want to remove. Then, click the “Clean & Repair” button to initiate the cleaning process.
- (optional) Restart your computer: Adwcleaner may prompt you to restart your computer to finalise the removal process. Save any unsaved work, close all programs, and click “Restart” when prompted.
By following these steps, you’ll effectively remove adware and other unwanted software from your computer, ensuring better overall performance. Don’t forget that Gooroo Technical Services computer repairs is a professional computer repair services if you need additional assistance.
Running SFC and DISM
Explanation of what SFC and DISM are and why they’re important for computer repair
System File Checker (SFC) and Deployment Image Servicing and Management (DISM) are essential Windows utilities that can help you repair your computer by detecting and fixing corrupted or missing system files. SFC is a built-in Windows tool that scans and repairs system files, while DISM is used to service and repair Windows images, including the Windows Recovery Environment and Windows Setup.
Running these tools together can resolve various issues and improve your computer’s stability and performance. We frequently run these tools on computers we’re fixing.
Often, when a client’s computer would constantly freeze and display a blue screen error, after running SFC and DISM, we’d be able to fix the corrupted system files, and the client’s computer returned to normal functioning.
These tools are invaluable when it comes to repairing a computer.
Steps to follow when running SFC and DISM for computer repair
Follow these steps to use SFC and DISM effectively:
- Open Command Prompt: Press the Windows key and type cmd in the search bar. Right-click on “Command Prompt” and select “Run as administrator” to open it with administrative privileges.
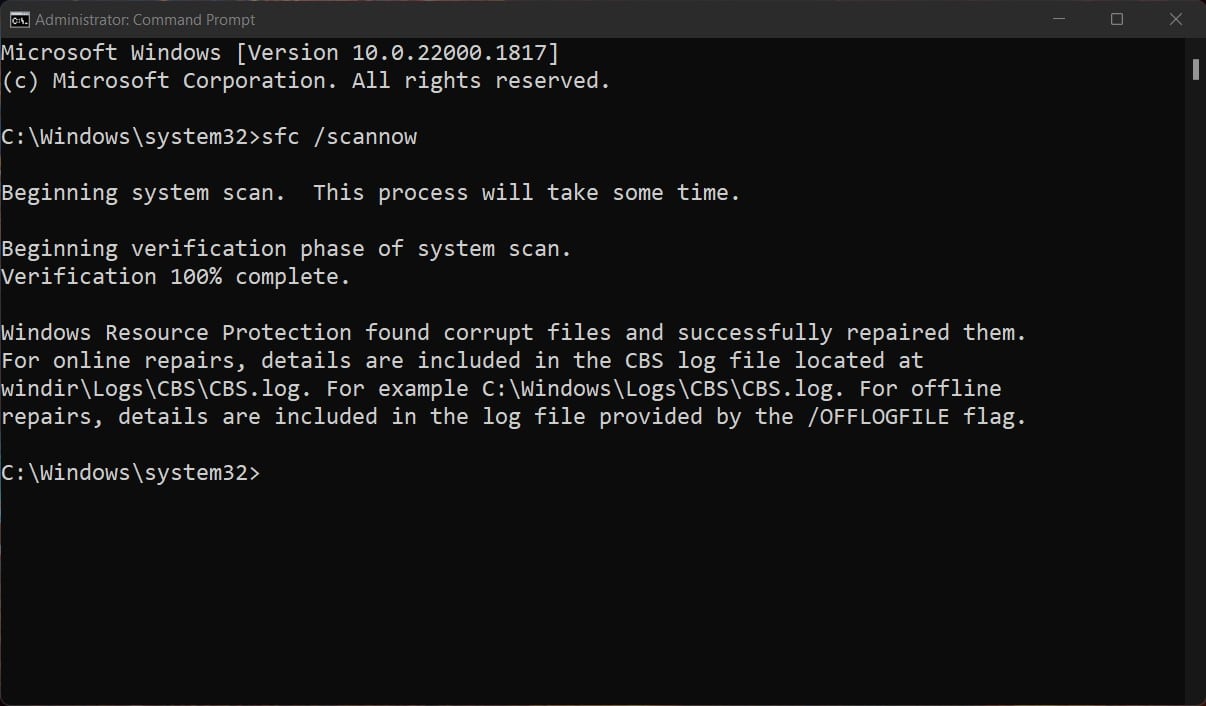
- Run SFC /scannow: In the Command Prompt window, type sfc /scannow and press Enter. This command will scan and repair system files. The process may take some time, so be patient.
- Check SFC results: Once the SFC scan is complete, check the results. If the scan found and fixed any issues, restart your computer. If the scan found issues but was unable to fix them, proceed to the next step to run DISM.
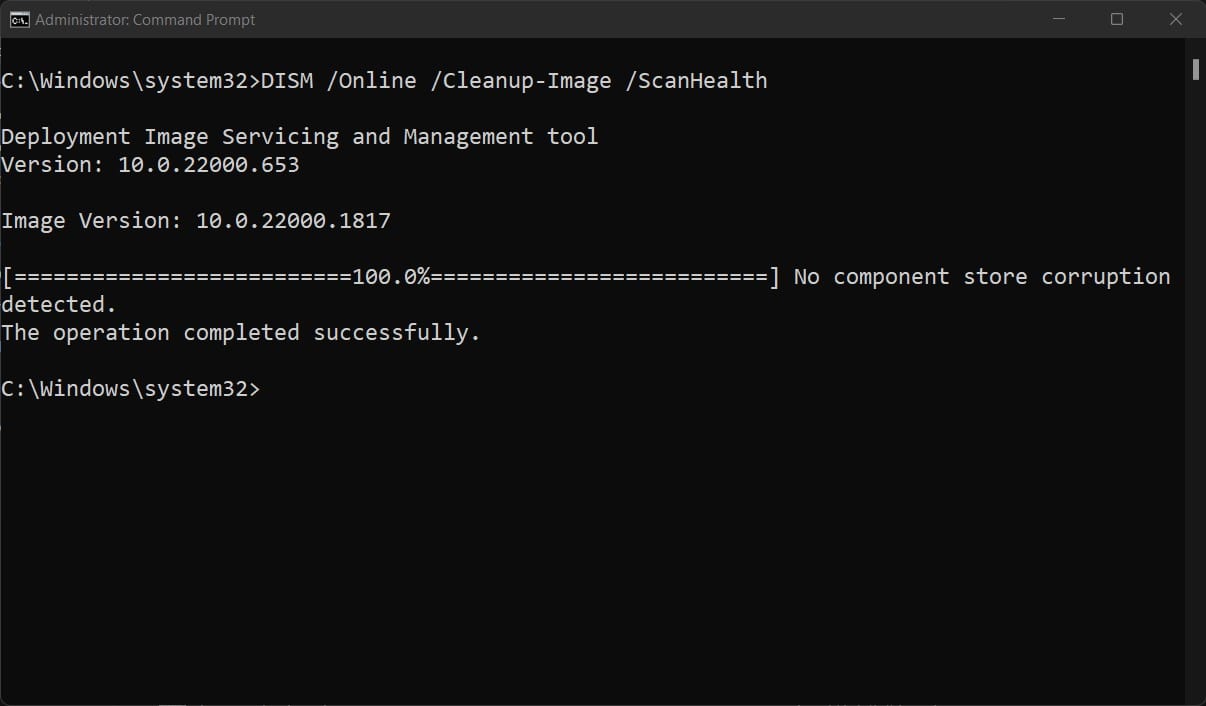
- Run DISM: In the Command Prompt window, type DISM /Online /Cleanup-Image /RestoreHealth and press Enter. This command will scan the Windows component store and repair any corrupted files using Windows Update. The process may take a while, so allow it to complete.
- Re-run SFC /scannow: After DISM has completed, run the sfc /scannow command again to fix any remaining system file issues.
- Restart your computer: Once both SFC and DISM have finished, restart your computer to apply the changes.
By following these steps, you’ll effectively repair corrupted or missing system files, leading to a more stable and well-performing computer. If you ever need professional computer repair services, remember that Gooroo Computer Repairs is always there to help.
Here are the commands and what they look like on a typical computer repair using SFC and DISM.
sfc /scannow
DISM /Online /Cleanup-Image /CheckHealth
DISM /Online /Cleanup-Image /ScanHealth
Disk Cleanup
Explanation of what Disk Cleanup is and why it’s important for computer repair
The Disk Cleanup app from Windows is a free tool built into Windows for removing unnecessary files, temporary data, and cached information from your computer to free up storage space and improve performance.
Over time, your computer accumulates these files, which can slow down your system and even cause errors. Regularly performing a disk cleanup is essential for maintaining the optimal functioning of your computer and preventing potential issues.
Steps to follow when using Cleanup for computer repair
Follow these step-by-step instructions to use the Windows Disk Cleanup app to clean up system files and help repair a computer:
- Press the Windows key: Press the Windows key on your keyboard to bring up the Start menu or search bar, depending on your Windows version.
- Type ‘Disk Cleanup’: Type “Disk Cleanup” into the search bar and press Enter.
- Select the utility: Click on the “Disk Cleanup” utility in the search results to open it. This tool can be particularly helpful when repairing a computer with storage space issues.
- Choose the drive: In the Disk Cleanup window, you’ll be prompted to select the drive you want to clean up. Usually, the C: drive is the primary drive containing system files. Select the drive and click “OK.”
- Wait for the calculation: Disk Cleanup will calculate the amount of space that can be freed up by deleting various file types. This process may take a few moments, depending on the size of your drive and the number of files.
- Click ‘Clean up system files’: In the Disk Cleanup window, click on the “Clean up system files” button. This action will prompt the utility to search for additional system files that can be removed, such as Windows Update installation files and temporary files.
- Choose the drive again: You’ll be prompted to select the drive again to clean up system files. Select the appropriate drive (usually C:) and click “OK.”
- Wait for the calculation again: Disk Cleanup will calculate the amount of space that can be freed up by deleting system files. This process may take a few moments.
- Select file types to delete: In the Disk Cleanup window, you’ll see a list of file types with checkboxes next to them. Check the boxes for the file types you want to delete, such as “Temporary Windows Installation Files,” “Windows Update Cleanup,” and “System error memory dump files.” Be cautious and avoid deleting essential files, like “Device driver packages,” unless you’re certain they’re no longer needed.
- Click ‘OK’: Once you’ve selected the file types to delete, click “OK” to proceed.
- Confirm deletion: A confirmation prompt will appear, asking if you’re sure you want to permanently delete these files. Click “Delete Files” to confirm and start the cleanup process.
By using the Disk Cleanup app to delete the selected system files, you’ll be able to free up valuable storage space on your computer. This process may take some time, depending on the amount of data being deleted.
Once completed, close the Disk Cleanup app. Regularly performing disk cleanup can aid in repairing a computer by optimising storage space and improving system performance.
Running Autoruns
Explanation of what Autoruns is and why it’s important for computer repair
Autoruns is a powerful utility developed by Microsoft Sysinternals that allows you to view and manage programs, services, and drivers that automatically start when your computer boots up.
Some of these auto-starting programs can negatively impact your computer’s performance, consume system resources, or even carry malicious intent. Running Autoruns helps you identify and disable unnecessary startup items, enhancing your computer’s performance and security.
Often we encounter situations on our client’s computers where it takes an unusually long time to start. Upon running Autoruns, we generally discover several unnecessary programs launching during startup, which slowed down the boot process. By disabling these programs, we I significantly reduced my computer’s startup time.
Steps to follow when using Autoruns for computer repair
Follow these steps to use Autoruns effectively:
- Download Autoruns: Download the latest version of Autoruns from the Microsoft Sysinternals website. Make sure to download from the official source to avoid installing malicious software.
- Extract the downloaded file: Autoruns comes in a compressed ZIP file. Extract the contents of the ZIP file to a folder on your computer. You generally can just open it and it will show the decompressed files.
- Run Autoruns: Navigate to the folder where you extracted the Autoruns files and locate the “Autoruns.exe” file. Right-click on the file and select “Run as administrator” to open Autoruns with administrative privileges.
- Examine the Autoruns list: Autoruns will display a list of all auto-starting programs, services, and drivers on your computer. Go through the list carefully and identify any items you don’t recognise or deem unnecessary.
- Research unknown items: If you come across an item you’re unsure about, research it online to determine its purpose. Be cautious about disabling items related to your computer’s hardware or essential system processes. If in doubt, do not delete it!
- Disable unnecessary items: To disable an auto-starting item, uncheck the box next to it in the Autoruns list. It’s crucial to be cautious when disabling items, as some of them may be essential for your computer to function correctly.
- Restart your computer: After disabling unnecessary startup items, restart your computer to apply the changes and observe any improvements in your computer’s startup time and overall performance.
By using Autoruns to manage auto-starting programs, you’ll streamline your computer’s startup process and enhance its performance. If you need additional help with computer repairs or optimising your system, remember that we offer professional computer repairs in the Northern Rivers and Australia wide and can assist you.
Using Event Viewer
Explanation of what Event Viewer is and why it’s important for computer repair
Event Viewer is a built-in Windows tool that allows you to monitor and review system events, application logs, and security-related incidents on your computer. This information is invaluable when diagnosing and troubleshooting various issues, such as system crashes, application errors, and hardware failures. By using Event Viewer, you can identify patterns or specific events that may be causing problems, which is crucial for effective computer repair.
In the past, I experienced a mysterious system crash that would occur sporadically without warning. By examining the Event Viewer logs, I was able to pinpoint the exact driver causing the issue and promptly resolved the problem. To do this I needed to identify the event IDs and error codes contained within the events leading up to the failure, and then research possible reasons online.
B. Steps to follow when using Event Viewer for computer repair
To use Event Viewer effectively, follow these steps:
- Open Event Viewer: Press the Windows key and type “Event Viewer” in the search bar. Click on the search result to open the application.
- Explore the logs: In the Event Viewer window, you’ll see a list of categories in the left pane, including “Application,” “Security,” “System,” and others. Click on a category to view its logs in the central pane.
- Filter the logs: To focus on specific events, you can apply filters to the logs. Right-click on the log category in the left pane and select “Filter Current Log.” In the filter window, you can set criteria, such as event level (e.g., Critical, Error, Warning) or a specific event ID, then click “OK.”
- Review the event details: Double-click on an event in the central pane to view its detailed information. This information may include the event’s description, date and time, source, event ID, and other relevant details.
- Research event IDs and sources: If you encounter an event with an unfamiliar event ID or source, research it online to learn more about the issue and potential solutions.
- Export logs for further analysis: You can export the logs to a file for further analysis or to share with a professional for assistance. To export a log, right-click on the log category in the left pane, select “Save All Events As,” and choose a location to save the file.
By using Event Viewer to analyse your computer’s logs, you’ll gain insight into the causes of various issues and take the necessary steps to resolve them. For professional computer repair services and additional assistance, remember that Gooroo Computer Repairs is always available to help.
Conclusion
Recap of the 5 best software procedures for repairing a computer running Windows
In this article, we’ve covered the five best software procedures for repairing a computer running Windows:
- Running Adwcleaner: This tool helps identify and remove adware, browser hijackers, and other potentially unwanted programs, ensuring a safer browsing experience.
- Running SFC and DISM: These utilities scan and repair corrupted or missing system files, improving your computer’s stability and performance.
- Disk Cleanup: Regularly performing a cleanup removes unnecessary files, temporary data, and cached information, freeing up storage space and enhancing your computer’s performance.
- Running Autoruns: This powerful utility allows you to manage auto-starting programs, services, and drivers, streamlining your computer’s startup process and boosting its performance.
- Using Event Viewer: By examining system events, application logs, and security-related incidents, you can diagnose and troubleshoot various issues affecting your computer.
Importance of following these procedures to ensure successful computer repair
Following these software procedures is crucial for maintaining the optimal functioning of your computer and preventing potential issues. By regularly performing these tasks, you’ll not only improve your computer’s performance but also enhance its security.
One of my personal experiences involved a slow computer startup. Using Autoruns, I discovered several unnecessary programs launching during the boot process and disabled them, significantly reducing the startup time. In another instance, I used Event Viewer to identify a driver causing sporadic system crashes, resolving the issue promptly.
Remember, if you ever need professional assistance with computer repairs or optimizing your system, Gooroo Computer Repairs offers expert services to help you keep your computer running smoothly.
In conclusion, by incorporating these five software procedures into your computer maintenance routine, you’ll be better equipped to identify and resolve issues affecting your system. A well-maintained computer will not only perform optimally but also serve you reliably for years to come. Don’t hesitate to seek professional help when needed, and remember that a proactive approach to computer care can save you time, effort, and money in the long run.
